Create resource rules
Resource rules protect access to your applications by requiring users to pass a predetermined risk assessment and authentication requirements. You can create a new resource rule for an application or clone an existing resource rule.
Resource rules use an authentication flow to determine how a user authenticates to a protected resource. You can create authentication flows as you build a resource rule or create them in advance. See Create authentication flows for more information.
Attention: Before you begin, it is important to review the information on the Create and manage resource rules page. This page provides more information on how resource rules work, features available, and details about limitations. It is also important to review the information on this page, especially the "Terminology and tips" section.
Terminology and tips
Before you begin building your resource rule, review the following terminology and tips.
Graphs
When you build a resource rule, you create a graph. The following explains the terms used in the graph.
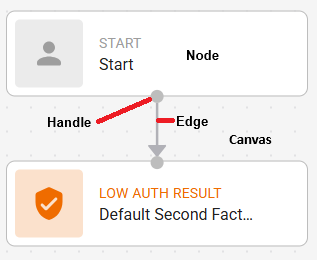
- Node The rectangle components in a graph.
- Edge The line that connects two nodes.
- Handle The connection point on a node where edges can be attached (the grey circle on the top or the bottom on the node).
- Canvas The empty space in the graph building area.
- Settings The configuration options for a node added to a resource rule graph. They appear on the side of the graph area when a node is selected.
Side Bar
The Side Bar appears at the side of your graph area.

The Side Bar includes the following icons:
Add button
- Click to display the Task menu.
- Click again or click anywhere in the Canvas to hide the Task menu.
The Task menu allows you to add the following nodes to your graph:
- Access Filter
- Authentication Context References Configure to evaluate users with an ACR specified in their request. This resource rule can be considered only for matching ACR requirements. See Add Authentication Context References for more information. Available for SAML, OIDC and OAuth, Authentication API, and Identity as a Service applications.
- Domain-based IdP Configure to evaluate users that are associated or not associated with a domain. This resource rule can only be considered for matching domain requirements. Available for the User, User Edit, and Administrator portals, and SAML and OIDC and OAuth applications.
- Group Configure the group of users that are evaluated based on the resource rule. This resource rule can only be considered for matching group requirements.
- Risk Factors (add the following Risk Factors)
- Date/Time Configure allowed date ranges, time of day, and time zones. This risk factor applies to all applications, but it is the only applicable risk factor for Entrust Identity Enterprise Legacy applications.
- Device Verification Require a user to perform device verification. No configuration required. Not available for RADIUS applications.
- External Add External Risk Engines as a risk factor. See Manage external risk engines for more information. Available only for Authentication APIs and Identity as a Service and OIDC and OAuth applications.
- Geolocation Configure to allow or deny access from specific countries.
- Source IP Address Configure allowed or denied IP addresses.
- Location History The Risk-Based Authentication (RBA) settings of your Identity as a Service account define the location history. There is no additional configuration required. See Manage risk-based authentication settings for more information.
- Machine Authentication Configure risk points for device fingerprint mismatches. This risk factor is not applicable to RADIUS applications.
- Transaction Used to set Transaction Condition settings. See Manage Transactions on the Create and manage resource rules page for more details about transactions. Available for Identity as a Service, Authentication API, and OIDC and OAuth applications using the JWT IDaas grant type.
- Travel velocity The Risk-Based Authentication (RBA) settings of your Identity as a Service account define the travel velocity conditions. There is no additional configuration required. See Manage risk-based authentication settings for more information.
- Logic Task Configure the risk assessment.
- Access Evaluation Set the access requirements users must meet to be able to access the resource.
- Risk Evaluation Set the risk evaluation to determine a user's risk to allow or deny access to the protected resource.
- Auth Task Result Allow or deny access to the protected resource.
- Allow Access
- Deny Access
- Access Filter
Tidy button
Click to improve the appearance of your graph.
Undo a change
Click to undo your last change.
Redo a change
Click to redo your last undone change.
Error messages
- No errors found
- Error detected
Building tips
- Click in the Canvas of the graph to display the General Settings.
- Click a Node to display the settings for the node.
- Click Save to save your changes as you build the resource rule.
- To Delete a node, select it in the graph and click Delete, or click the node to display the settings, and click the Delete icon in the settings panel.
- To delete a risk factor, you can delete it from the graph or click the node to display the risk factor setting and click the Delete icon.
- To hide the Task menu, click anywhere in the Canvas.
- As you add nodes to the resource rule, click the Tidy button to clean the graph and reduce the space it takes on the Canvas.
- To add multiple nodes to a flow element, for example three different Risk Factors, click the Task menu and add them to the Canvas first before you arrange them and connect them with edges to the connecting node in the flow (either Start or Access Evaluation).
- Hover over a node or the edge between two nodes to see the symbol and then click the add symbol to see the nodes that you can add to the node or between the two nodes.
- For example, you added a Geolocation risk factor and connected it to the Start menu, but now you want to add a Group Access Control. Use the add button on the edge between Geolocation and Start to directly add an Access Filter node between them.
Topics in this section
Sample resource rule graphs
A resource rule follows this flow:
Error messages
When building a resource rule graph, the Side panel displays error messages if any are found in the graph, using the following icons:
Add resource rules
3 items
Manage resource rules
After you create a resource rule, you can edit, delete, and enable or disable them as required.