Migrating User Data
If you are using an Entrust Identity Enterprise 13.0 installation, you must update to Patch 452872 or newer. If using Entrust Identity Enterprise Self-Service, upgrade to Patch 452874 or newer.
If you are using an Entrust IdentityGuard 12.0 installation, limited migration capabilities are built-in. For progressive migration, you must download the Entrust IdentityGuard to Entrust Identity as a Service Migration Tool 3.0 software package.
If you are using an Entrust IdentityGuard 10.2.x to 11.0 installation, no migration capabilities are built-in. You must download the Migration Tool 3.0 software package.
Before you begin migration
-
Ensure you are using the most up-to-date versions of your Entrust Identity Enterprise (formerly Entrust IdentityGuard) installations.
If you are using an Entrust Identity Enterprise 13.0 installation, update to the latest Patch (452872 or newer). If using Entrust Identity Enterprise Self-Service, upgrade to Patch 452874 or later.
If you are using an Entrust IdentityGuard 12.0 installation, upgrade to the latest Patch. Limited migration capabilities are built-in. For progressive migration, you must download the Entrust IdentityGuard to Entrust Identity as a Service Migration Tool 3.0 software package.
If you are using an Entrust IdentityGuard 10.2.x to 11.0 installation, no migration capabilities are built-in. You must download the Migration Tool 3.0 software package.
If you use Entrust Identity Enterprise Self-Service, update to the latest Patch available for your installed version.
-
Migration requires the login credentials associated with one of the three Master User accounts.
If you are using Migration Tool 3.0 in conjunction with progressive migration, you will additionally require a valid administrative user and associated password. This administrative user must have the
userSetpermission. It is recommended to create a separate administrative user for use of Migration Tool 3.0. -
If you expect to migrate large user sets or are experiencing difficulties in migrating large user sets, review the suggestions below.
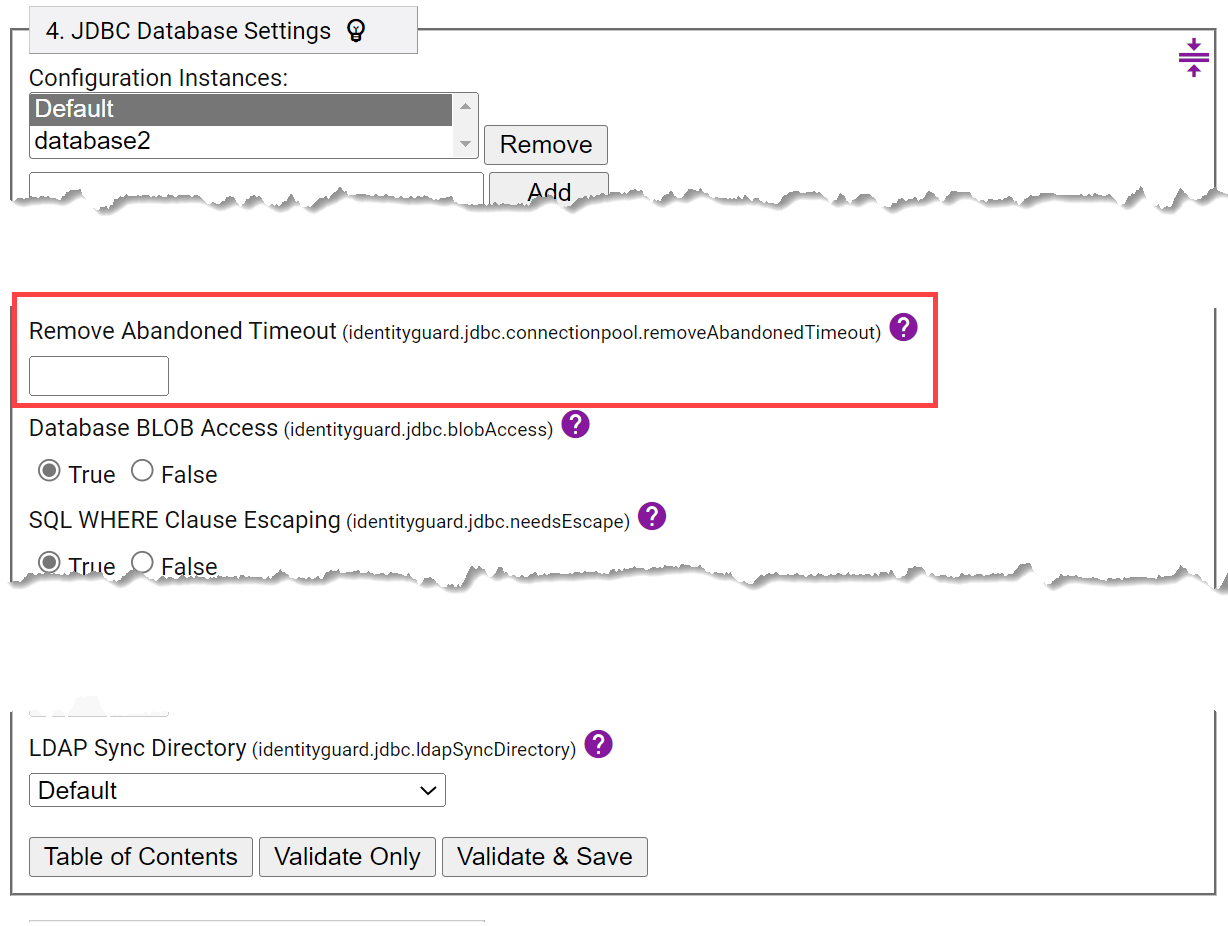
By default, the Remove Abandoned Timeout property (
identityguard.jdbc.connectionpool.removeAbandonedTimeout) is set to 300 seconds (5 minutes). If you encounter some difficulty migrating a large number of users and an LDAP or DB vendor connection closed event error log appears after the currently set Remove Identity Timeout time frame, it is likely that the Remove Identity Timeout property value should be increased.If you intend to migrate a large number of users at once, increase the Remove Abandoned Timeout property value. Suggested guidelines are as follows:
Number of users Suggested Timeout (seconds) Less than 10,000 Default: 300 10,000 - 40,000 1800 50,000 - 80,000 3600 80,000 - 120,000 5400 More than 120,000 Increase further as needed Many factors affect the minimum required property value, such as network speed and repository load.
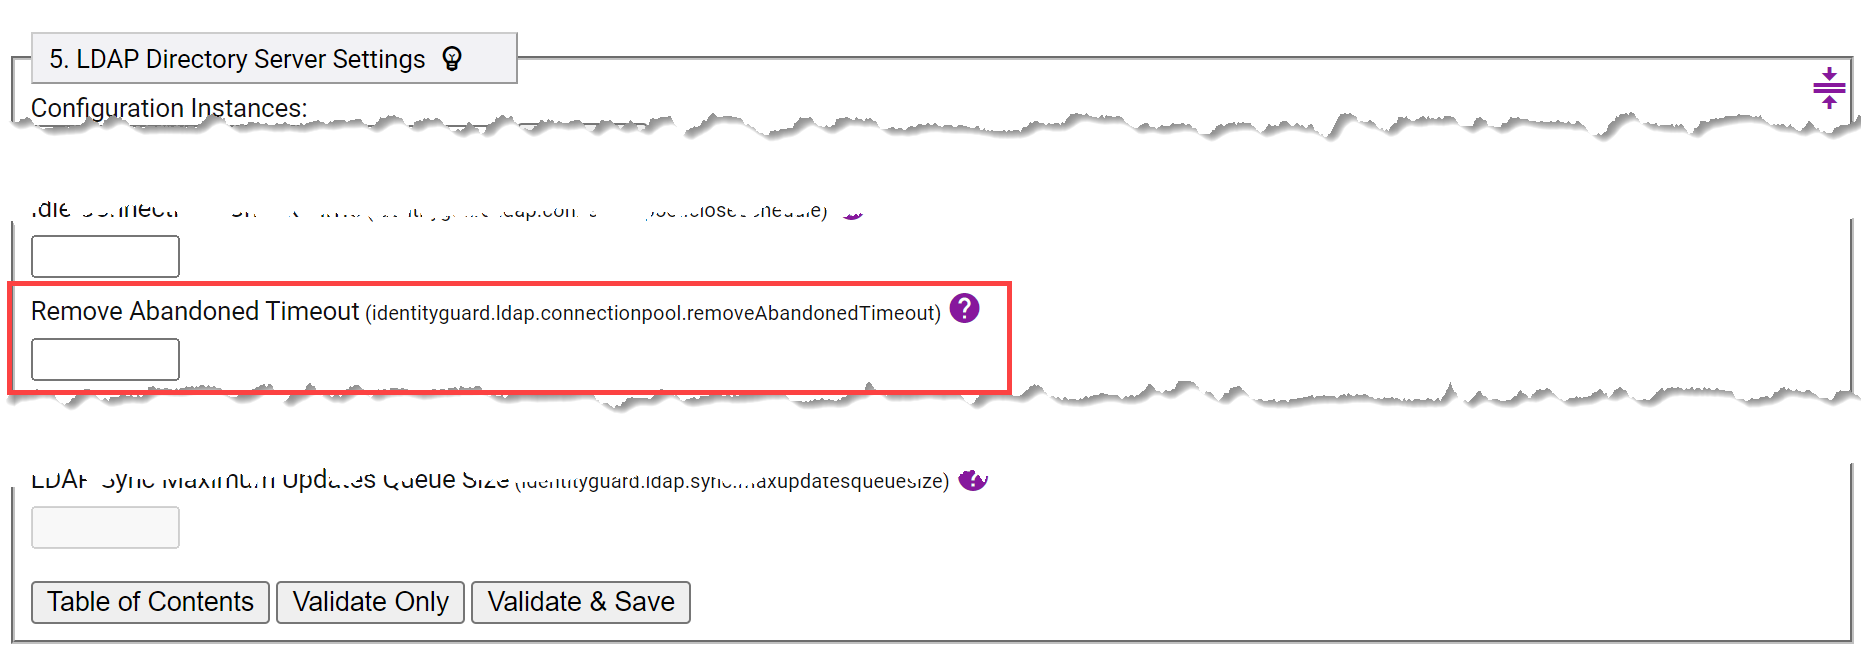
You can adjust the Remove Abandoned Timeout property in your Entrust Identity Enterprise Properties Editor.
If using an up-to-date IdentityGuard 12.0 installation or newer:
a. In Identity Enterprise Properties Editor:
If your user accounts are in a database, navigate to JDBC Database Settings.
OR
If your user accounts are in an LDAP repository, navigate to LDAP Directory Server Settings.
OR
If your user accounts are in both a database and an LDAP repository, update the Remove Abandoned Timeout settings in both JDBC Database Settings and LDAP Directory Server Settings.
b. Click Validate & Save.
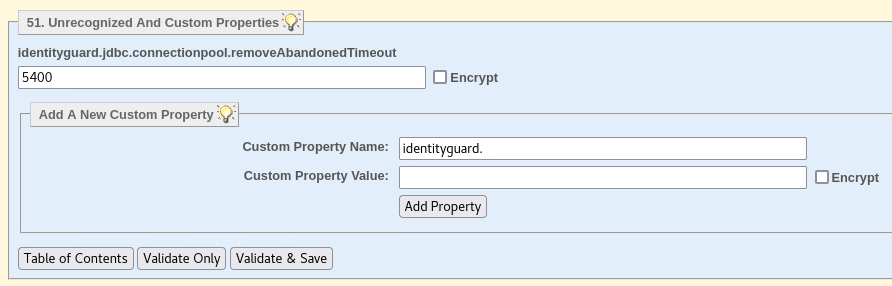
If using an installation older than IdentityGuard 12.0:
a. In Properties Editor, navigate to Unrecognized And Custom Properties.
b. Under Add A New Custom Property, enter
identityguard.jdbc.connectionpool.removeAbandonedTimeoutas Custom Property Name, and enter the desired timeout value as Custom Property Value.c. Select Add Property, then Validate & Save.
 note
noteThe Remove Abandoned Timeout property specifies the timeout in seconds to remove abandoned objects if they exceed the designated timeout when pool maintenance runs.
-
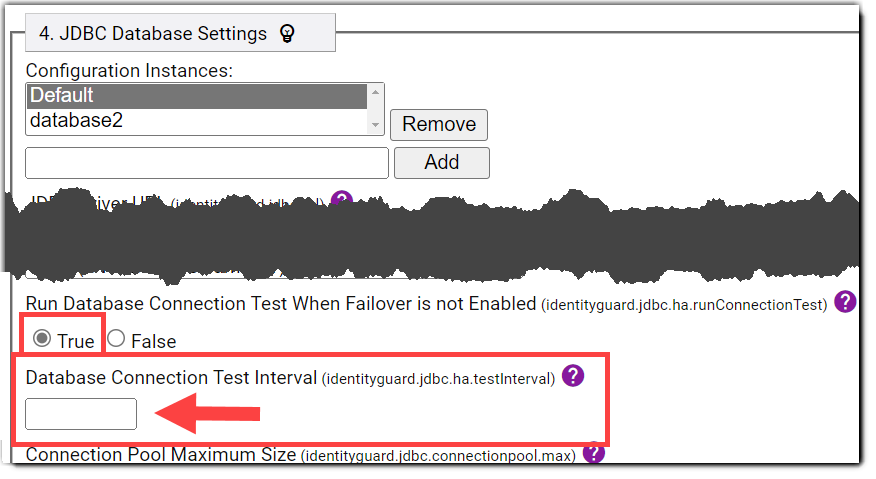
If increasing the Remove Abandoned Timeout property value does not resolve difficulties in migrating a large user set, try reducing the load on the database by disabling database connection testing. In Entrust Identity Enterprise Properties Editor, set Run Database Connection Test When Failover is not Enabled to False.
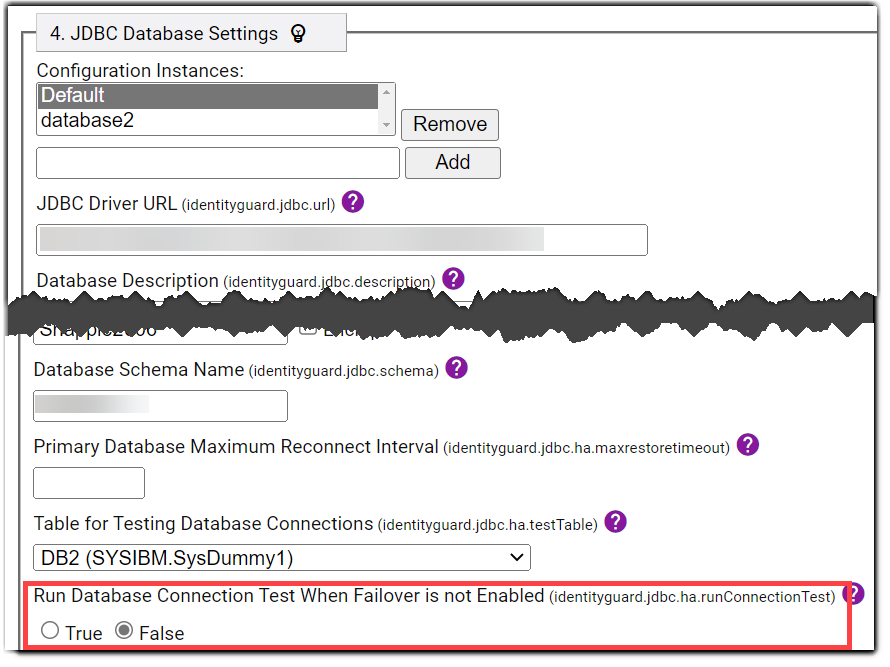
Alternatively, if disabling database connection testing causes issues (which is unlikely if the database is performing correctly), leave Run Database Connection Test When Failover is not Enabled set to True and increase the connection test interval. To do so, enter a new higher value (in seconds) for the Database Connection Test Interval property. The default is 5 seconds if only one database driver URL is provided and the Run Database Connection Test When Failover is not Enabled property is set to True. The default is 0 seconds if multiple database driver URLs are provided.
-
If there is still difficulty migrating a large user set after increasing Remove Abandoned Timeout or modifying connection testing (or both), consider reducing the number of users you are migrating at a time. External factors such as network latency and database performance can contribute to overall migration efficiency. Reducing the size of user subsets may help to minimize reductions to efficiency caused by external factors. Due to the variability of external factors, there is no set rule on the maximum user set size for progressive migration.
Progressive migration: Exporting data
Progressive migration lets you create flexible and dynamic user subsets that can be gradually migrated to Entrust Identity as a Service. It also allows administrators to track subsets that are designated for migration as export, exported, imported, and fully migrated.
If using an Entrust IdentityGuard 12.0 installation or earlier, to carry out progressive migration, you must first download and set up Migration Tool 3.0.
Export data from Entrust Identity Enterprise
To export data that will migrate to Entrust Identity as a Service, use an updated Entrust Identity Enterprise 13.0 installation or Migration Tool 3.0. In either case, use the computer that hosts your primary Entrust Identity Enterprise server.
To gradually export data from Entrust Identity Enterprise (Progressive migration)
-
Identify a subset of users you want to migrate and export them to a file using the Master User Shell
user listcommand. Specify a location to store the file containing the list of the selected users:user list <options that define the characteristics of the users you wish to export> -export "C:/Program Files/Entrust/IdentityGuard/migrate_users.xml" -
If using Linux or Solaris:
While authenticated to the account that owns the Entrust IdentityGuard installation, source the environment settings using the following command:. /opt/entrust/identityguard<version>/env_settings.sh -
If using Release 13.0, skip to step 4.
If using a release prior to 13.0:
Using the same account you use to log in to the Entrust IdentityGuard Master User Shell, start Migration Tool 3.0. To do so, run the script that is appropriate for your system:cd IG_Migration_Tool_3/bin(for Unix)
authexport_ig.sh(for Windows)
authexport_ig.batMigration Tool 3.0 prompts for an administrative user name and associated password the first time a command that will add, change, or delete an alias is invoked. It only does so once per session, as the credentials are cached and re-used if the Admin API session expires due to inactivity. It is strongly recommended to create an Entrust IdentityGuard administrative user specifically for this tool. The administrator requires the
userSetpermission that can be found in the built-inuseradminrole.noteBe sure to use forward slashes, as this works best with Java. Also, if your file path includes a space, enclose the file path with quotation marks.
noteIf Migration Tool 3.0 fails to run after an attempted login and generates an error, it may be that a handshake cipher issue is occurring. For more details on this issue and how to solve it, see If handshake cipher issues occur when attempting to connect to a repository over TLS.
-
After the desired set of users is identified and a corresponding list is exported, add an alias prefix to each user name. This creates an alias for each user. The aliases will be unique, since each user name must be unique, but will have a uniform alias prefix of your choice. This helps ensure smooth migration of user sets.
Release 13.0
Use the following command in the Master User Shell:
user set -import "C:/Program Files/Entrust/IdentityGuard/migrate_users.xml" -aliasPrefix -add EXPORT_Release 12.0 or earlier
Use the following command in Migration Tool 3.0:
user set -import "C:/Program Files/Entrust/IdentityGuard/migrate_users.xml" -aliasPrefix -add EXPORT_The command above tells Release 13 or Migration Tool 3.0 to refer to the list of users you selected and create an alias for each user with the format of PrefixUsername. In the case where the prefix is EXPORT_, the alias becomes, for example, EXPORT_Username.
With this process, you can identify the set of users to export. By changing the prefix throughout the migration process, it becomes straightforward to track the migration progress of your user sets.
noteAliases have a maximum length of 255 characters. Since an alias is, in this case, an alias prefix attached to a unique username, the sum of the username length and the alias prefix length must not exceed 255 characters.
-
Export the user set identified by your chosen alias prefix into an encrypted file. This file, along with a corresponding password, is later decrypted in Identity as a Service. Change the alias prefix of this user set to reflect the fact that the accounts are now exported. Use the command below:
system authexportbyalias -file "<Location>" -aliasPrefixToExport <exportAliasPrefix> -aliasPrefixExported <exportedAliasPrefix>For example, if the alias prefix of the user subset was EXPORT*, and you want the alias prefix to become EXPORTED* after export to an encrypted file, the command might look as follows:
system authexportbyalias -file “C:/Program Files/Entrust/IdentityGuard/idaas_import.enc” -aliasPrefixToExport EXPORT_ -aliasPrefixExported EXPORTED_noteBy default, you are prompted to confirm your actions when using the
system authexportbyaliascommands, and an explanation of what would happen is displayed. If you wish to avoid such prompts, add the-forceoption. -
To verify the status of the export, use the following command:
system authexportbyalias -status -forceIf the steps complete successfully, the finish date and time are displayed.
Example result:
authexportbyalias: Export file: "C:/Program Files/Entrust/IdentityGuard/idaas_import.enc"authexportbyalias: steps completed: 1 of 1authexportbyalias: user number: 156 of maximum user number: 156authexportbyalias: exported users: 35 of possible 156authexportbyalias: Completed at: Wed Aug 05 09:56:46 GMT-04:00 2022You can also view details within the audits automatically generated in your Entrust Identity Enterprise installation. All audits related to Migration Tool 3.0 can be found in
sam_audit.log. Similarly, regular logs generated by this tool can be found insam_system.log. Entrust Identity Enterprise 13.0 writes the audits tosupersh_audit.log. -
Identity as a Service requires a password to successfully import the encrypted list of users. This strong password is generated internally by your Entrust Identity Enterprise application or Migration Tool 3.0. Use this command in the Master User Shell or Migration Tool to view the password:
system authexportbyalias -password -forceExample:
authexportbyalias: File: "C:/Program Files/Entrust/IdentityGuard/idaas_import.enc"authexportbyalias: Password: a~mi6oBGH0]*noteMigration Tool 3.0 stores only one decryption password at a time. You can view only the most recently generated password. If you will need access to a password later, record or enter the password into a temporary file and store it in a secure location.
-
To migrate the users to Entrust Identity as a Service, see Migrate data to Entrust Identity as a Service.
Bulk migration: Exporting all data at once (or by group)
To migrate all user data at once, use the Entrust Identity Enterprise (formerly Entrust IdentityGuard) Master User Shell to export data that will migrate to Entrust Identity as a Service. This method also allows for export by group.
To migrate data gradually by designated sets of users, a more flexible progressive migration option is available with the Standalone Migration Tool 3.0. See Progressive migration: Exporting data.
If using IdentityGuard 12.0 or newer:
This functionality is built into your installation. Migration Tool 3.0 is not required.
If using IdentityGuard 10.2.x to 11.0:
Migration Tool 3.0 is required.
Regardless of which application you use, be sure to run it from the computer that hosts your primary Identity Enterprise server.
To export all data at once (or by group)
-
If using Linux or Solaris:
While authenticated to the account that owns the Entrust IdentityGuard installation, source the environment settings by entering the following command:
. /opt/entrust/identityguard<version>/env_settings.sh -
If using IdentityGuard 12.0 or newer:
Start the Master User Shell. See Using the Master User Shell in the Entrust Identity Enterprise Server Administration Guide.
If using IdentityGuard 10.2.x to 11.0:
Using the same account you use to log in to the Entrust IdentityGuard Master user shell, start Migration Tool 3.0. Run the script that is appropriate for your system:
(For Unix)
authexport_ig.sh(For Windows)
authexport_ig.batnoteIf Migration Tool 3.0 fails to run after an attempted login and generates an error, it may be that a handshake cipher issue is occurring. For more details on this issue and how to solve it, see If handshake cipher issues occur when attempting to connect to a repository over TLS.
-
To start the export, enter the following command in your Master user shell (if running Entrust Identity Enterprise releases 12 or 13) or Migration Tool (if running Entrust IdentityGuard releases 10.2.x or 11):
system authexport -file <file> -userid <userid> -group <group>where:
-file <file>is the file to which the data is exported. This argument is required.-userid <userid>is an optional argument that lets you specify the user or users to migrate.
To export data for all users, do not specify the
-useridargument.Example of command for exporting data for all users:
system authexport -file <IGusers>To export users by group,
<group>is the Entrust Identity Enterprise group being exported. This argument is optional. Use it only if you want to export users from a specific group or groups. Group policy is not migrated to Entrust Identity as a Service. If you are specifying multiple groups, leave a space between each group name. If a group name begins with a hyphen, prefix it with a hyphen.Example of command for exporting data for a subset of users:
system authexport -file <file> -userid dm* -group group1With this example command, the exported file would contain data for Entrust Identity Enterprise users in
group1whose user IDs begin with the letters "dm" and any unassigned hardware tokens or grid cards that belong to group1.However, it is recommended to instead use the progressive migration process. In addition to offering greater flexibility, progressive migration allows you to track user subsets through the migration process. See Progressive migration: Exporting data.
To export data for a single user or for user names with common characteristics, specify an exact value with the
-useridargument (for example,IGuser1) for one user, or a wildcard character (for example, initials likedm*) to specify user IDs that share a common characteristic. To escape the wildcard character (if it might be used as part of a user ID), prefix it with a backslash (\).For more syntax information, see the
user listcommand in the Entrust Identity Enterprise Master User Shell Command Reference.noteWhen the export starts, Entrust Identity Enterprise generates a strong password internally. The password is encrypted for master users.
-
To verify that the export has completed, enter the following command in your Master user shell (if running Entrust Identity Enterprise release 12 or 13) or Migration Tool 3.0 (if running Entrust IdentityGuard releases 10.2.x or 11):
system authexport -statusExample result:
authexport: Export file: C:\Program Files\Entrust\IdentityGuard\identityguard120\myexport.datauthexport: steps completed: 2 of 2authexport: user number: 156 of maximum user number: 156authexport: exported users: 35 of possible 156authexport: exported unassigned tokens: 4authexport: Done at: Wed Aug 05 09:56:46 GMT-04:00 2022 -
If the status shows that the export completed successfully, when a Master User is prepared to view the strong password that Entrust Identity Enterprise or Migration Tool 3.0 created internally to encrypt the exported data file, the Master User must log in to Master User Shell or Migration Tool 3.0 and enter the following command:
system authexport -passwordExample:
authexport: File: C:\Program Files\Entrust\IdentityGuard\identityguard120\myexport.datauthexport: Password: a~mi6oBGH0]*This password is required to import the exported data into Entrust Identity as a Service.
AttentionIf a user has an online generated soft token identity whose identity provider needs to be changed from Entrust Identity Enterprise Self-Service to Entrust Identity as a Service, the migration process is not yet complete. See Update the IdP URL for mobile tokens.
If using Entrust IdentityGuard 12.0:
The Mobile Identity Provider Migration Filter built into the latest patch updates the Identity Provider Address for all users. This process cannot be done progressively or by group from the installation. To update the Identity Provider URL progressively, download Migration Tool 3.0 and the Mobile Identity Provider Migration Filter 2.0, then use alias prefixes to identify user subsets.noteIf you intend to migrate a large number of users, or are experiencing difficulty in migrating a large number of users, consider increasing the Remove Abandoned Timeout property value. See Before you begin migration.
Export unassigned authenticators for import into Identity as a Service
This section is applicable only to users carrying out progressive migration. In other words, it only applies to those using the command system authexportbyalias. If you are carrying out bulk migration (using the command system authexport), unassigned authenticators are always included in addition to users.
-
You can export unassigned authenticators, such as preproduced grid cards created in advance to assign to users, or unassigned hardware tokens loaded into the system. Use the following command in Entrust Identity Enterprise 13.0 or in Migration Tool 3.0:
system authexportbyalias -file "<location>" -unassignedAuthenticatorsFor example:
system authexportbyalias -file "C:/Program Files/Entrust/IdentityGuard/idaas_import_unassigned.enc" -unassignedAuthenticatorsWhen prompted, confirm whether you want to follow through with the action.
-
Use the following command to access the status of the export:
system authexportbyalias -status -force -
View the password required for Entrust Identity as a Service to import the encrypted list of unassigned authenticators with the following command:
system authexportbyalias -password -force
Additional commands
Entrust Identity Enterprise 13.0 and Migration Tool 3.0 include some commands that might be helpful if you encounter any difficulties.
-
If you made an error when identifying users to import into Entrust Identity as a Service (for example, you assigned an alias with the prefix
EXPORT_to a user you do not want to migrate), undo the action with theuser setcommand.If the mistake was made in a user list exported to
migrate_users.xml, you could do as follows to remove the alias prefix:user set -import "C:/Program Files/Entrust/IdentityGuard/migrate_users.xml" -aliasPrefix -remove EXPORT_ -forceDelete the file (in this case,
migrate_users.xml) containing a set of users mistakenly included for migration.
Audits
Migration Tool 3.0 writes audits to the sam_audit.log in Entrust Identity Enterprise. If using Entrust Identity Enterprise 13.0 Patch 452872 or newer (not requiring the use of Migration Tool 3.0), Identity Enterprise writes the audits to supersh_audit.log.
Entrust Identity as a Service migration audit messages
These messages provide information about the process of migrating Entrust Identity Enterprise data and authenticators to Entrust Identity as a Service. For more information, see Migrate data to Entrust Identity as a Service.
| Audit message | Log level | Default SNMP trap? | Event description |
|---|---|---|---|
| Migration to "Entrust Identity as a Service" authenticator export initiated by "0" started. (AUD8500) | INFO | Yes | Authenticator export for migration to Entrust Identity as a Service started. Where: 0 is a placeholder for the command that was invoked. For example, system authexportbyalias -file "C:/Program Files/Entrust/IdentityGuard/idaas_import.enc" -aliasPrefixToExport EXPORT_ -aliasPrefixExported EXPORTED_ |
| Migration to "Entrust Identity as a Service" authenticator export initiated by "0" failed: 1 (AUD8501) | ERROR | Yes | Authenticator export for migration to Entrust Identity as a Service failed. Where: 0 is a placeholder for the command that was invoked and 1 is a placeholder for the failure reason. |
| Migration to "Entrust Identity as a Service" authenticator export initiated by "0" completed with status: 1 (AUD8502) | INFO | Yes | Authenticator export for migration to Entrust Identity as a Service completed with status 1. Where: 0 is a placeholder for the command that was invoked and 1 is a placeholder for the success status. |
| Migration to "Entrust Identity as a Service" export password request initiated by "0" was displayed to a master user. (AUD8503) | INFO | Yes | Export password for migration to Entrust Identity as a Service was displayed to a master user. Where: 0 is a placeholder for the command that was invoked. |
| Migration to "Entrust Identity as a Service" alias renaming request initiated by "0" started. (AUD8504) | INFO | Yes | Alias renaming request for migration to Entrust Identity as a Service started. Where: 0 is a placeholder for the command that was invoked. |
| Migration to "Entrust Identity as a Service" alias renaming request initiated by "0" failed: 1 (AUD8505) | ERROR | Yes | Alias renaming request for migration to Entrust Identity as a Service failed. Where: 0 is a placeholder for the command that was invoked and 1 is a placeholder for the failure reason. |
| Migration to "Entrust Identity as a Service" alias renaming request initiated by "0" completed with status: 1 (AUD8506) | INFO | Yes | Alias renaming request for migration to Entrust Identity as a Service completed. Where: 0 is a placeholder for the command that was invoked and 1 is a placeholder for the success status. |
| Migration to "Entrust Identity as a Service" add export alias prefix request initiated by "0" started. (AUD8507) | INFO | Yes | Request to add an export alias prefix for migration to Entrust Identity as a Service started. Where: 0 is a placeholder for the command that was invoked. |
| Migration to "Entrust Identity as a Service" add export alias prefix request initiated by "0" completed with status: 1 (AUD8508) | INFO | Yes | Request to add an export alias prefix for migration to Entrust Identity as a Service completed. Where: 0 is a placeholder for the command that was invoked and 1 is a placeholder for the success status. |
Migrate data to Entrust Identity as a Service
Use this procedure to migrate data, such as user contact information, in bulk from Entrust Identity Enterprise to Entrust Identity as a Service. To perform this procedure, you must have access to the environment where you used the Entrust IdentityGuard Master User Shell or Migration Tool 3.0 to create the export file and its password, as well as the environment that hosts Entrust Identity as a Service.
A welcome email is sent to the email address of each user created on Entrust Identity as a Service. Administrators can customize the text of that email to provide context for account migration if they want.
Confirm the following before migrating the Entrust Identity Enterprise data to your Entrust Identity as a Service account:
- The Entrust Identity Enterprise export file has been generated.
- The password for the Entrust Identity Enterprise export file is accessible. This password is displayed in Entrust Identity Enterprise 13.0 release and in Migration Tool 3.0 when you perform a
system authexportbyalias -passwordcommand orsystem authexport -passwordcommand. - If migration was done from an Entrust Identity Enterprise 12.0 installation, the password is displayed when you perform a
system authexport -passwordcommand.
To configure and run data migration
-
Log in to your Entrust Identity as a Service account.
-
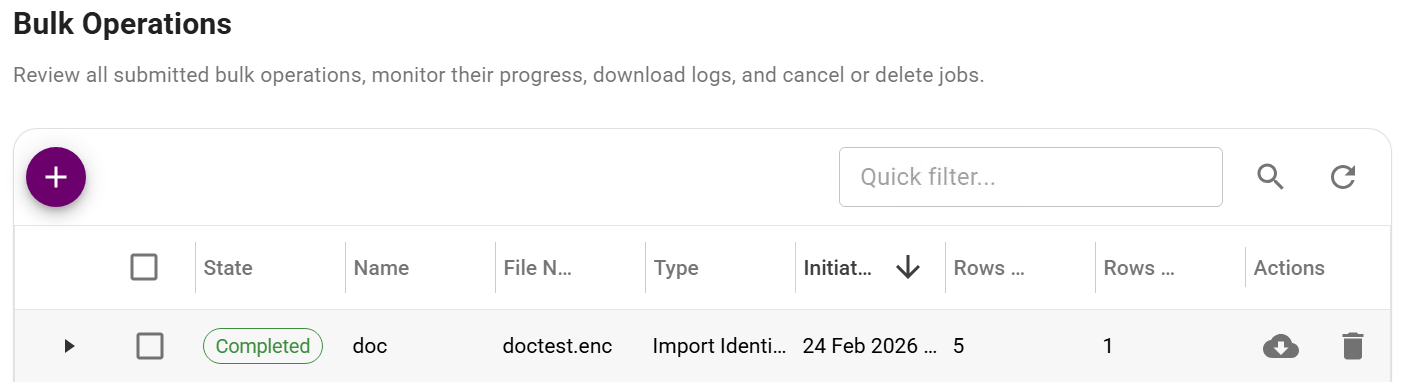
From the left navigation pane, select Bulk Operations. The Bulk Operations page appears on the right.
-
Click the plus icon. The Bulk Import page appears.
-
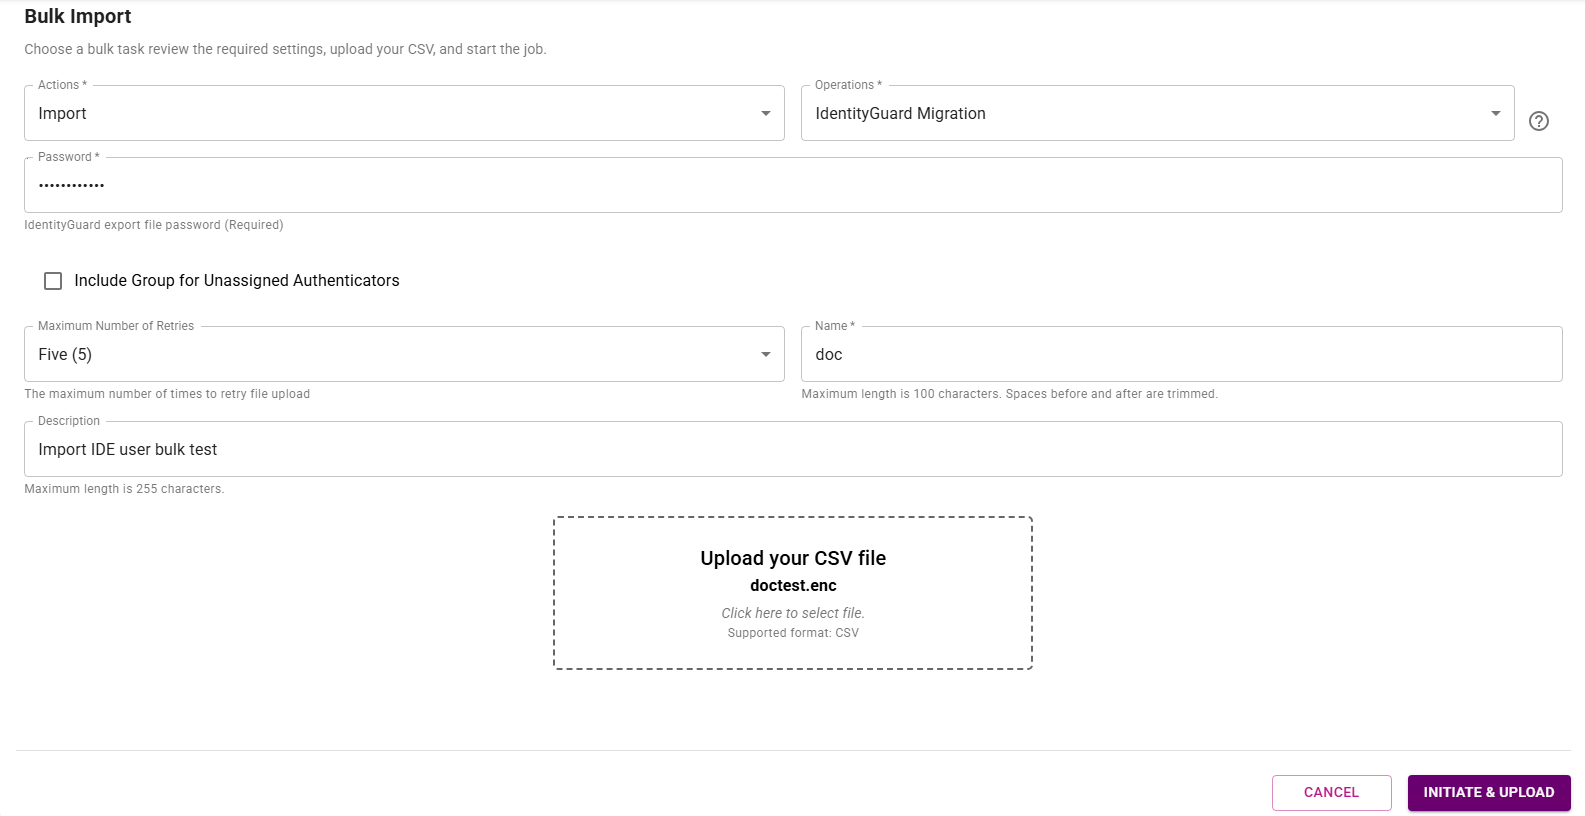
Complete the following fields:
a. Operations: From the drop-down list, select IdentityGuard Migration.
b. Actions: From the drop-down list, select Import.
c. Password: Enter the password of the Entrust IdentityGuard export file. The password is generated automatically by Entrust IdentityGuard or Migration Tool 3.0 during the export operation. The password can be viewed only by a master user logged in to the Master User Shell or Migration Tool.
d. Name: Enter a unique name for your bulk operation that identifies the operation in the bulk import report table. The name cannot contain these symbols:
>and<.e. Description: Enter a description for the bulk operation so that other viewers can understand the purpose of that operation.
-
Click Upload your CSV file. An Open window appears.
-
Browse to and select the export file, and then click Open. The file name appears in the Upload your CSV file box.
noteThe file name you select must include only a file name and not a file path. File names that contain file paths are rejected.
-
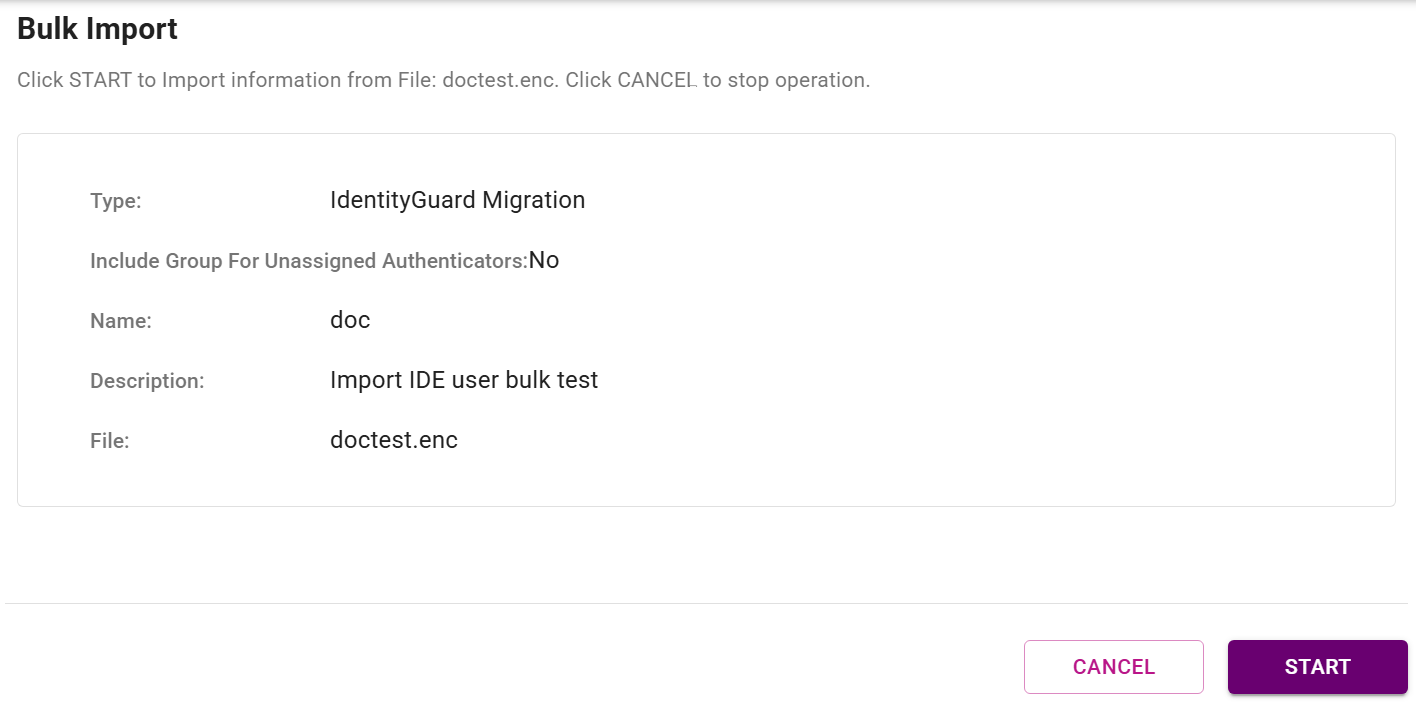
Click INITIATE & UPLOAD. The Bulk Import page appears, displaying information about the file you selected in Step 6 above.
- Click Start. The Bulk Operations page with a list of all submitted bulk operation appears. The State column first displays Processing, and then Completed, on the row for your bulk operation when the operation is successful.
Bulk Operations page
In the Entrust Identity as a Service administrator portal, the user profile for each migrated user displays Entrust Identity Enterprise Migrated User and the migrated authenticators are shown on each user's list of authenticators.
For email values, the Entrust Identity Enterprise contact values are searched by name in the order specified in Identity Enterprise until contact information with a value is found. If an Entrust Identity Enterprise contact is not found, then the rest of the contact information is searched until one that looks like an email address is found.
For mobile and phone attributes, the Entrust Identity Enterprise contact information is searched in the following order until values are found:
- Mobile phone
- Phone
- Work phone
- Home phone
- Review the detailed list of account changes that were made during migration. The migration event is logged in your Entrust Identity as a Service Account Audit Events.
For more information on migrating data to Entrust Identity as a Service, see the Entrust Identity as a Service Administrator Help.
Updating the alias prefix for imported and migrated users
When Entrust Identity as a Service receives the list of users you want to migrate, these users have a common alias prefix designating them as the user subset to be imported (aliasPrefixExported). Update the alias to reflect the fact that the users in this list have now been either imported or fully migrated to Identity as a Service.
If a user has online-activated soft tokens that still reference Entrust Identity Enterprise, they are considered Imported. They are not fully migrated, however, until the Identity Provider associated with the soft token identity is changed to refer to Entrust Identity as a Service.
If a user is fully migrated and does not require any update to their soft tokens, they are considered migrated. You can set these alias prefixes with the following command, using -aliasPrefixImported and -aliasPrefixMigrated:
system authexportbyalias -aliasPrefixExported <EXPORTED_> -aliasPrefixImported <IMPORTED_> -aliasPrefixMigrated <MIGRATED_>
where:
<EXPORTED_>is replaced by the previously assigned alias prefix for exported users,<IMPORTED_>is a designated alias prefix of your choice to designate users imported to Identity as a Service that still require an update to their soft tokens,<MIGRATED_>is a designated alias prefix of your choice to designate fully migrated users.
If the user has an online-generated soft token identity whose identity provider needs to be transitioned from Entrust Identity Enterprise or Entrust IdentityGuard Self-Service to Entrust Identity as a Service, the migration process is not yet complete. See Update the IdP URL for mobile tokens.